CBC-PROC-212 Version 2 last review date: Sep, 2020
1. Create a New Schedule
Navigate to Contract List or Site List from the main Navigation Panel.
Select the Contract from the Contract List view.
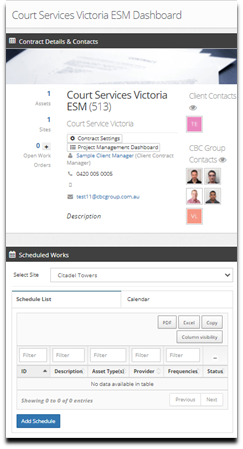
On the Contract Dashboard > Scheduled Works panel, select a Site.
Select “Add Schedule”, to begin the Schedule Creation Process.
Continue the process from Step 3.
2. Finding an Existing Schedule
Navigate to Contract List or Site List from the Navigation Panel.
Select Contract from the Contract List View.
On the ‘Scheduled Works’ panel, Select a Site from the Drop-down List. This will display the Schedules and Calendar for the selected site.
Click on the ‘ID’ or ‘Description’ for review the Schedule.
3. Editing a Schedule
ℹ️
Editing or adding a Schedule follows the same process.
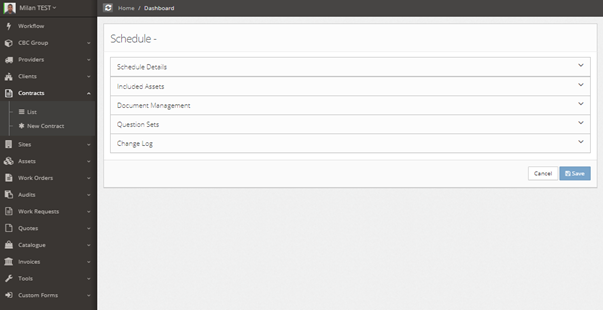
- Complete each field and setting. Refer to the below table for an explanation of each field.
- Save the Schedule.
- Review the Calendar as it appears on the Overview tab. Ensure that Work Orders to be raised are appearing where expected. The Calendar will also indicate where Work Orders will be combined based on the selected Hierarchy options.
| Detail | Definition |
|---|---|
| #### Schedule Details Panel | |
| Status | Indicates if the Schedule is Active. Inactive schedules will not generate work orders. |
| Description | Description of the schedule. This field will appear as the Work Order description, in combination with the Frequency and Scale. (i.e. 3M – Description) |
| Contract | Indicates which Contract the schedule belongs to. |
| Site | Indicates which Site the schedule belongs to. |
| Commence from date | Indicates the start of the period of time a schedule will be active. Only when the Next Due date of the Schedule Entry falls after this date will it be raised. Checking the ‘as per Contract’ checkbox will draw this date from the Contract Settings. |
| Cease from date | Indicates the end of the period of time a schedule will be active. Only when the Next Due date of the Schedule Entry falls before this date will it be raised.Checking the ‘as per Contract’ checkbox will draw this date from the Contract Settings. |
| #### Hierarchy Rules | Hierarchy governs whether Schedule Entries that fall due at the same time should be combined on one Work Order, such as when a 12M and a 3M are due together. Where this is enabled, one Work Order that combines both services is generated. If disabled, two Work Orders will be generated. |
| Enable Hierarchy Process (Combine created Work Orders) | Controls whether the schedule entries that are due to be raised at the same time should be combined on to one Work Order. |
| Combine Frequency Descriptions on the resulting Work Order | Controls whether the description that appears on the work order displays all of the frequencies, or just the highest. (i.e. ‘12M – Description’, or ‘3M+12M – Description’) |
| Include question sets from lower priority frequencies. | Specifies whether the questions under the applicable Schedule Entry and included for the more frequent service, or only the highest. |
| Combine Work Orders where Next Due date matches but Days Before and After do not. | Specifies that when considering Hierarchy, Work Orders that would have the same 'Next Due' date and are using the 'By Day' mode, should be combined, even if they would have different start and end dates. |
| Use the Days Before/After from the highest frequency | By checking this box will determine the start and end dates is by using the Days Before and Days After of the longest frequency. |
| Use the Days Before/After from the lowest frequency | By checking this box will determine the start and end dates is by using the Days Before and Days After of the shortest frequency. |
| #### Schedule Entries | Each schedule entry represents a recurring attendance and will generate a Work Order when it falls due. At least one Schedule Entry is required for each Schedule. |
| Scale | Allows selection of the time scale (Days / Weeks / Months / Years, Specific Days) from the drop-down List. Combined with Frequency, this determines the interval between services, i.e. 1 Month, or 2 Weeks. If ‘Specific Days’ is selected, WO's would be raised for each day where the day of the week matches and counting from the next due date. |
| Frequency | Select the frequency value. Combined with Scale, this determines the interval between services, i.e. 1 Month, or 2 Weeks. |
| Est. Hours (Optional) | Select the number of hours that the service will take to complete. |
| Attendance Date Mode | A setting that controls what mode is used to generate the start and end dates of the Work Order.By Day: The start and end dates of the Work Order will be placed according to the values in the ‘Days Before’ and ‘Days After’ fields. The start date will be ‘Next Due’ minus ‘Days Before’, and the end date will be ‘Next Due’ + ‘Days After’ In Month: The start and end dates will be placed at the beginning and end of the month. By Specific Days: The Day(s) of the week where work orders will be raised for the scheduled period. |
| Days Before | Indicates how many days are subtracted from the Next Due date when generating the start date of a Work Order. Only available when using the ‘By Day’ mode. |
| Days After | Indicates how many days are added to the Next Due date when generating the end date of a Work Order. Only available when using the ‘By Day’ mode. |
| Tolerance (Optional) | To be used to determine whether a service has been completed within statutory required time frames. Note: No functionality makes use of this field yet. |
| Provider | The Provider who will be undertaking the works. Only those assigned to the Contract will be made available in this list. |
| Next Due Date | The date that the attendance is next due. This date is automatically incremented by the amount specified by the Scale and Frequency fields after each Work Order is generated. |
| Never Combine | Indicates if this Schedule Entry should be combined with other Schedule Entries, when considering Hierarchy. If checked, this Schedule Entry should never be combined with any other, regardless of the Hierarchy settings of the Schedule. If the primary Hierarchy settings is off, this has no effect. |
| #### Work Order Settings | These settings will be applied to all Work Orders that are generated from this Schedule. |
| Work Order Type | Select Work Order Type from the Drop-down List. |
| Priority | Select Work Order Priority depending on criticality. |
| Customer Reference Number | Fill the Customer Reference Number, if applicable. |
| Requestor | Enter Requestor’s Name. |
| Requestor Phone | Enter Requestor’s Phone Number. |
| Site Contract | Select the Site Contract from the Drop-down List. |
| Site Contract Phone Number | Enter Site Contract Phone number. |
| #### Included Asset | This panel lists the assets that will appear on all Work Orders that are generated from this Schedule. |
| Search | Select the “Search” options for adding Assets to the raising Schedule Work. |
| Remove | Select the “Remove” button to delete any select Existing Assets currently selected. |
| Add | Select the “Add” button to Add New Assets to the current list. |
| #### Document Management | Documents added to a Schedule will be distributed with the Work Order. |
| Add | Allows the addition of documents to the Schedule. |
| #### Change log | |
| Table | Lists changes to the Schedule that have been made over time. |