CBC-PROC-273 Version 1 last review date: Mar, 2020
1.0 Overview
This section provides an overview of the CMMS Quote process and the major steps involved.
Start Quote
- From an existing Work Order
- From an existing Work Request
- Or from the ‘New Quote’ menu option
Fill in quote
- Complete each section (Details, Client, Body, Line Items, Assets, Links)
- [Optional] Mark quote as ‘Awaiting Provider Quote’ if necessary.
- [Optional] Complete the Work Order Details section so it is ready for the Raise Work Orders step
Internal Approval of Quote
- Click the ‘Approve (Internal)’ button
- You may need to select a user to provide further approval based on your Quote Approval Limit. Selecting another user will generate a notification for that user so they are aware.
Submit Quote
- You can review the PDF template via the ‘Template View’ section first
- Click the ‘Submit Quote’ button
Client Approves Quote
- [Optional] Approve the Quote on the client’s behalf
Raise Work Orders
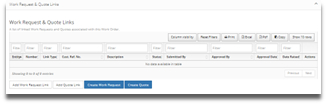
- Utilise the Work Order Details section to raise work orders – More Details Or raise Work Orders manually and create a link on the Quote > Links section
Send Work Orders
- Use the Links section to navigate to raised Work Orders and use the ‘Resend Work Order’ function to send Work Orders to Providers.
2.0 Starting a New Quote
This section details the various ways to start creating a new quote.
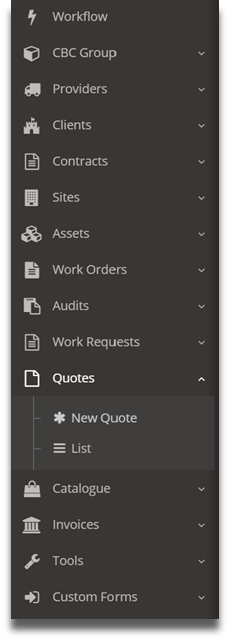
2.1 Create a New Quote via the Navigation Panel
- Click the ‘New Quote’ button under ‘Quotes from the Navigation Panel.
- A new Quote will be started however no data will be pre-populated as it is when starting a quote from an existing Work Order or Work Request.
2.2 Create a new Quote via a Work Order
- Navigate to a Work Order.
- Click the ‘New Quote’ button. A new Quote will be started, pre-populated with the Contract, Site, Assets, and a ‘Source’ link.

2.3 Create a new Quote via a Work Request
- Navigate to a Work Request.
- Click the ‘Convert to Quote’ button. A new Quote will be started, pre-populated with the Contract, Site, Assets, and a Source’ link.
3.0 Filling in the Quote
This section covers how to complete each section of the quote and will provide detail around how each field should be populated.
3.1 Details Panel
The Details panel includes the Contract, Site(s), Status, lead and program times of the Quote as well as a summary of the cost price of the Quote.
3.1.1 Completing the Details Panel
- Complete each field on the Details panel.
- Change the status to ‘In Progress’ to indicate the Quote is actively being prepared. The Quote must have the ‘In Progress’ state to allow it to be internally approved.
3.1.2 Details Panel Fields
| Field | Opt/Man | Details |
|---|---|---|
| Quote Title | Mandatory | Enter a Quote title. The Quote Title will appear in various places, such as the Quote List and in email and PDF templates, and on Notifications |
| Customer Reference No. | Optional | Enter a Customer Reference Number. This represents the clients reference number for this quote. |
| Contract | Mandatory | Select a Contract from the list. The list contains Contracts to which you have access based on your assignments. |
| Site(s) | Mandatory | Select one or more Sites from the list. Available sites are based on the Contract selected and your assignments. |
| Service Type(s) | Varies | Allows the selection of one or more Service Type tags. Contract Settings determines if this field is optional or mandatory. |
| Status | Mandatory | while others can only be reached by clicking the appropriate buttons |
| Primary Contact | Mandatory | Allows selection of a User who is the responsible for the Quote. |
| Expiry Period / Date | Optional | Enter or select the number of days the Quote will be valid for, counted from the date of submission. The specific expiry date is not determined until the quote is submitted. If this field is left blank, the quote will not expire. |
| Approx. Lead Time | Optional | Enter or select a number of days representing the time from Approval to when works are likely to commence. |
| Approx. Program | Optional | Enter or select a number of days representing how long the works will take to complete. |
| STATUS | VISIBLE TO CLIENT | DESCRIPTION |
|---|---|---|
| Requested | No | Indicates the Quote has been requested by the Client and has not yet been submitted. The status can be manually changed to “In progress”, “Awaiting Provider Quote” and “On Hold”. |
| In Progress | No | Indicates the Quote is being prepared and has not yet been submitted. The status can be manually changed to “Requested” and “On Hold”. Once all mandatory fields are completed, the Quote can be Internally Approved or sent for further internal approval. |
| Awaiting Provider Quote | No | Indicates the Quote is awaiting further information or clarification from the Provider before it can be submitted. When the information is received from the provider, the status can be manually changed to “Requested”, “In Progress” or “On Hold”. |
| Internal Review | No | Indicates the Quote has been forwarded to an Internal user for further approval. |
| Review Passed | No | Indicates the quote is internally approved and is ready for submission to the Client. |
| Review Failed | No | Indicates the Quote is internally rejected. The Quote can be modified and re-submitted for internal approval. |
| Submitted | Yes | Indicates the Quote is submitted to the Client. |
| Expired | Yes | Indicates the Quote has become expired due to the Quote’s Expiry date being met. Expired Quotes become archived after 60 days from the date they became expired. |
| Approved | Yes | Indicates the Quote has been approved by or on behalf of the Client. From this status forward, some changes to the Quote may invalidate the approval. A warning message is displayed to the user about approval invalidation. |
| Approved & Converted to Work Order | Yes | Indicates the approved Quote has been converted to Work Orders. Quotes with this status are considered archived. |
| Declined | Yes | Indicates the Quote has been declined by or on behalf of the Client. |
| Superseded | Yes | Indicates the Quote has cancelled, due to it being superseded by a new or alternative Quote. |
| Cancelled | No | Indicates the Quote has cancelled by a user. The Quote status can be manually changed to “Request”, “In Progress”, “Awaiting Provider Quote” and “On Hold”. |
3.2 Client Panel
The Client panel allows users to select Client information on the Quote. The Information specify this Panel will be determine where the Quote should be submitted to.
3.2.1 Completing the Client panel
- In most cases, all fields will be pre-selected based on Contract and Site selections on the Details panel.
- Review the pre-selected Client Users and Invoicing Group.
- Complete any fields that have not been pre-selected.
3.2.2 Client Panel Fields
| FIELD | OPT/MAN | DETAILS |
|---|---|---|
| Client | Mandatory | The Client of the Contract. The field is pre-selected based on the selected Contract. |
| Attention | Optional | Allows selection of Client users to whom the Quote should be made attention to when submitting. The list includes Client User’s who are assigned to the selected Contract and Site(s). Users who also have the ‘Receive Quote’ notification option selected will be pre-selected. Names can be entered manually if necessary. |
| Invoicing Group | Mandatory | Allows selection of a Client Invoicing Group to whom the quote should be submitted. This represents the entity that will be responsible for paying the resulting invoice. The available Client Invoicing groups are those set up on Client Settings. If a default Invoicing Group is selected on Contract Settings it will be pre-selected. Also, if there is only one Invoicing Group for a Client, it will be pre-selected. |
| ABN | Mandatory | Allows entry of the Clients ABN. This will auto-populate upon selection of an Invoicing Group and can be modified. |
| Bill To Address | Mandatory | Allows entry of the ‘Bill to’ Address. This will auto-populate upon selection of an Invoicing Group and can be modified. |
| Attend/Ship to Address | Mandatory | Enter the address that works should be conducted at, or goods delivered to. |
3.3 Body Panel
The Body panel allows users to select pre-defined headers and footers assigned to the selected Contract on the Quote and edit them if necessary. The available Headers and Footers in the List are determined from the contract settings.
3.3.1 Completing the Body Panel
- Select a template for the Header and Footer via the drop-down lists.
- Use the text editors to modify the Header and Footer fields to what is required for the Quote.
3.3.2 Selecting Templates
- The default and available Header and Footer template(s) are based on the selected Contract.
- You can select a different Template for the Header or Footer sections via the drop-down lists.
- Templates include special ‘tags’ that represent data from the quote, such as the Contract name, Site names etc.
- When a template is selected, including when the default template is selected automatically, the template content is populated into both the Header and Footer fields. This includes calculating the values of the special tags.
- When you select a template manually it will overwrite any content already present in the Header or Footer. It is therefore recommended to select your template prior to editing it.
3.3.3 Utilising Tags in the Header and Footer
- Tags can also be added manually after a template is selected.
- Position your cursor in the text editor where you want the field to appear.
- Click the ‘Fields’ button to show the drop-down list then select an option.
When a tag is selected into the template it’s value is calculated at that point in time. If you later change a value on the Quote, such as the site, the value in the template will not automatically be updated.
3.3.4 Body Panel Fields
| FIELD | OPT/MAN | DETAILS |
|---|---|---|
| Header | Optional | Represents the main text of the Quote. Edit the text and The Header section covers from the start of the pdf to Line items on the pdf. |
| Footer | Optional | The footer section covers from end of Line items to end of the pdf. |
3.4 Line Item Panel
The Line Item panel allows users to enter the appropriate buy and sell rates for each item that should appear on the Quote. Existing Catalogue Items can be selected, and options are provided to manually enter a mark-up percentage, a fixed addition, or a fixed price.
3.4.1 Adding a new Line Item
- Click the ‘Add Line Item’ button to add a new Line item.
- Fill in the Line Item pop-up form.
- Click the ‘Ok’ button to confirm changes and add the line item.
3.4.2 Editing an existing Line Item
- On the Line Item table, click the blue ‘Edit’ button to bring up the pop-up form.
- It is not possible to edit Line Items in the table itself.
3.4.3 Selecting Catalogue Items
- Click the ‘Catalogue Ref’ field dropdown and select an available Catalogue Item. This will populate both the Buy and Sell sections, leaving only the Quantity to be selected.
- Alternatively, click the ‘Browse Buy Prices’ or ‘Browse Sell Prices’ buttons to display the ‘Select Catalogue Item’ pop-up form and select just the Buy or Sell price, respectively.
3.4.4 Line Item Panel Fields
| FIELD | OPT/MAN | DETAILS |
|---|---|---|
| Catalogue Reference No. | Optional | Allows selection of a Catalogue Item from Catalogue Item list. Available Catalogue Items are determined based on the selected Contract and Sites, the Region the Site(s) are linked to, and the selected Provider. When a Catalogue Item is selected, the Buy Price and Sell Price sections are populated automatically. |
| Browse Buy Price | N/A | Displays a pop-up form allowing the selection of a Buy Price. Available Buy Prices are filtered to those related to the selected Provider, Contract and Site. |
| Browse Sell Price | N/A | Displays a pop-up form allowing the selection of a Sell Price. Available Sell Prices are filtered to those related to the selected Provider, Contract and Site. |
| Provider | Mandatory | Allows selection of a Provider from the drop-down list. Available Providers are those active on the selected Contract. |
| Description | Mandatory | Allows entry of a text description for the Line Item. |
| Category | Mandatory | Allows selection of a Category type for the Line Item. Available options are Labour or Material. |
| Quantity | Mandatory | Enter or select the quantity required for the Line Item. This value is used as the multiplier of both the Buy and Sell Price values. |
| UOM | Mandatory | Allows selection of a value representing the unit of measurement, such as Hour or Each. |
| Buy Price | Mandatory | Allows entry of a dollar value representing the pre-tax cost of one unit of the type selected in the UOM field. This value is multiplied by the Quantity fielded to form the Buy Price Subtotal value. |
| Buy Tax Type | Mandatory | Allows selection of a tax type from the available options of ‘Tax Free’, ‘GST 10%’ or ‘Manual’. If ‘Manual’ is selected, enter the tax percentage in the associated Value field. |
| Markup Type | Mandatory | Allows selection of a mark-up type to be used to calculate the Sell Price, usually with the Buy Price as the starting value. The ‘FixedPrice’ mark-up type indicates a set Sell Price for the Line item not based on the Buy Price. You will need to enter a dollar amount in the associated Value field. The ‘FixedAddition’ mark-up type indicates the Sell Price is determined by adding the dollar amount entered in the Value field Buy Price. The ‘FixedPercent’ mark-up type indicates the Sell Price is determined by adding a percentage of the Buy Price, equal to the number value entered in the associated Value field, to the Buy Price. |
| Sell Price | Mandatory | Allows manual entry of the Sell Price, a dollar value representing the pre-tax sell rate of line item. Generally, it should not be necessary to edit this field as it can be pre-populated by selecting a Catalogue item, or by utilising the Mark-up Type fields. |
| Sell Tax Type | Mandatory | Allows selection of a tax type from the available options of ‘Tax Free’, ‘GST 10%’ or ‘Manual’. If ‘Manual’ is selected, enter the Tax percentage in the associated Value field. |
3.4.5 Totals Fields
| FIELD | DETAILS |
|---|---|
| Buy Price – Subtotal | Total Buy price, excluding tax, of all Line Items. |
| Buy Price – Tax | Total tax amount of all Line Items. |
| Buy Price – Total | Total Buy price, including tax, of all Line Items. |
| Sell Price – Subtotal | Total Sell price, excluding tax, of all Line Items. |
| Sell Price – Tax | Total Sell tax amount of all Line Items. |
| Sell Price – Total | Total Sell price, including tax, of all Line Items. |
| Margin % | Total Margin, excluding tax, as a percentage. |
| Margin Subtotal | Total Margin, excluding tax, as a total. |
| Margin Total | Total Margin, including tax, as a total. |
3.5 Asset Panel
The Asset panel allows users to add assets to the Quote.
At least one Asset must be added to a Quote before it can be approved or submitted.
3.5.1 Add an Asset
- Click the ‘Add’ button bring up the Asset Selector pop-up form.
- Utilise the various fields to select an asset. Selections are limited to assets from Site(s) selected on the Quote.
- Click the ‘Select Asset’ button to add to the Quote.
- Repeat the process to add additional assets.
3.5.2 Asset Table Fields
| Field | Details |
|---|---|
| Site | The Site that the asset belongs to. |
| Primary Identifier | The Primary Identifier of the Asset. |
| Client Identifier | The Identifier provided by the Client, if ones exists for the asset. |
| Asset Criticality | The Criticality value of the Asset. |
| Asset Type | The Asset Type of the Asset. |
| Description / Nickname / Tag | The Asset Name, the Nickname Identifier, and any Tags that have been added to the Asset. |
| Location | The Physical Location, including sub-locations, of the Asset. |
| Action – Remove | Removes the appropriate asset from the Quote. |
| Action - Add | Opens the Asset Selection pop-up form allowing the selection of additional assets. Assets must belong to the selected Contract and Site(s). |
3.6 Links Panel
The Links Panel allows users to set up links to entities such as existing Quotes, Work Orders, and Work Requests. Links can be added after a Quote is approved without invalidating the approval.
3.6.1 Add a Link
- Click the ‘Add Link’ button to display the Link selection pop-up form.
- Select a Link Type.
- Select an Entity Type from the list.
- Click the ‘Ok’ button to confirm the selection and add the Link.
3.6.2 Links Panel Fields
| FIELD | DETAILS |
|---|---|
| Link Type | Select the Link type from the dropdown list. |
| - Alternative Quote - Indicates the linked Quote was raised as an alternative option to this Quote. | |
| - Raised from Quote – Indicates the linked Work Order was raised from this Quote. | |
| - Request for Quote WO – Indicates the linked Work Order is an RFQ Work Order related to this Quote. | |
| - Source – Indicates that the linked entity is the source of the quote. | |
| Entity Type | Allows selection of an entity type from the dropdown list. The available options are ‘Work Request’, ‘Work Order’ or ‘Quote’, and depend on the Link Type selected. |
| Entity Number | Allows selection of an actual Work Order, Work Request or Quote to be linked to this Quote. |
3.7 Work Order Details pane
The Work Order Details panel allows users to set up the details needed to generate Work Orders ahead of time, so once the quote is approved only a couple of clicks are needed to generate the Work Orders.
The ‘Auto-generate Proposed Work Orders’ function allows you to generate most of the Work Order details automatically based on the details and line items already added to the Quote.
Making changes to the Work Order Details panel will not invalidate any existing approvals.
3.7.1 Auto-generate Proposed Work Orders
- Click the ‘Auto-generate Proposed Work Orders’ button to auto generate Proposed Work Orders.
- Edit each line to complete mandatory fields that cannot be calculated automatically.
A proposed Work Order will be generated for each different Provider added to Line Items, multiplied by how many Sites have been selected. If there is more than one Provider, a proposed master Work Order will also be generated.
3.7.2 Add a Proposed Work Order manually
- Click the ‘Add Work Order’ button to display the Proposed Work Order Detail pop-up form.
- Populate all necessary fields, noting that some fields are mandatory.
- Click ‘Ok’ to close the pop-up form and save changes.
3.7.3 Complete the Shared Work Orders section
- Complete the necessary fields, paying attention to the mandatory ones
3.7.4 Create Work Orders
- Ensure that each entry on the Proposed Work Order table is complete and accurate.
- Ensure all fields on the Shared Work Order Settings section are accurate.
- Click the ‘Create Work Order’ button to raise a Work Order for each Proposed Work Order.
The ‘Create Work Orders’ button will create a Work Order for each line on the Proposed Work Orders table, using the settings entered for each line, and with the Shared Work Order settings.
The ‘Create Work Order’ button is only available to users once the quote has reached the ‘Approved’ status. In other words, it must be approved by the Client before Work Orders can be raised.
Work Orders are created only, not distributed. You will need to view each Work Order and use the ‘Resend Work Order’ function. Links to all created Work Orders will be available on the Links panel on the Quote.
This process is likely to change so that Work Orders are distributed automatically in future once the process is familiar to users and any required changes are made.
3.7.5 Proposed Work Order Table/Pop-up Form Fields
| FIELD | OPT/MAN | DETAILS |
|---|---|---|
| Master | Optional | Allows the user to specify if the proposed Work Order should be a master Work Order. Only one Master Work Order can be set per Site on the Quote. |
| Quote Lines | Optional | Allows the user to select the associated Quote Line Item that should be associated with this Work Order. |
| Site | Mandatory | Allows the user to select the associated Site for the Work Order. The available Sites are those selected on the Details panel. |
| Description | Mandatory | Allows the user to enter a description for the Work Order. |
| Instruction | Optional | Allows the user to enter instructions for the Work Order. |
| Safety Notes | Optional | Allows the user to enter Safety Notes for the Work Order. |
| Provider | Mandatory | Allows the selection of a Provider for the Work Order. The available Providers are those Providers who are assigned to the Contract. If the ‘Auto-generate Proposed Work Order’ function is used, the Provider field will be pre-populated with the Provider selected on the associated Line Item. |
| Service Type(s) | Varies | Allows selection of one or more Service Type(s), from those available on the selected Contract. Whether this field is mandatory or optional is governed by Contract Settings. |
| Work Order Type | Mandatory | Allows selection of a Work Order Type. Available Work Order Types are defined by Contract Settings. |
| Cost (ex tax) | Optional | Allows the user to enter a dollar amount that will transfer over to the CBC Quote Value field on the Work Order. This represents the Sell amount, excluding tax. When the ‘Generate Proposed Work Orders’ function is used, this is calculated automatically. |
| Date Method | Mandatory | Allows the user to select a method of calculating the attendance times. From Lead Time: Allows the attendance times to be calculated from the approval date and lead time, entered as a number of days. Specific Dates: Allows attendance times to be entered as specific days, as normal. |
| Commence After | Optional | Select when the Work Order should be commenced after. |
| Commence By | Mandatory | Select when the Work Order should be commenced by. |
| Complete By | Mandatory | Select when the Work Order should be completed by. |
| Invoice Status - Cost | Mandatory | Allows selection of the Cost status that will be applied to the Work Order when it is generated. The default selection is ‘Not Yet Confirmed’. |
| Invoice Status - Billing | Mandatory | Allows selection of the Billing status that will be applied to the Work Order when it is generated. The default selection is ‘Not Yet Invoiced’ . |
3.7.6 Shared Work Order Settings Fields
The Shared Work Order settings are applied to all Work Orders generated via the ‘Create Work Orders’ function, along with the settings for each individual proposed Work Order.
The shared settings are provided this way to avoid having to repeat them for each Proposed Work Order.
| FIELD | DETAILS |
|---|---|
| Priority | Allows selection of the Priority type for the Work Order(s). The available Priority Type(s) are based on the selected Contract’s settings. |
| Requestor | Allows selection or manual entry of the Requestor, representing the person who requested the works. The available Users in the list are client users assigned to the selected Contract and Site(s). |
| Requestor Phone | Allows entry of a phone number for the Requestor. The field auto-populates when a Requestor is selected or can be modified if necessary. |
| Site Contact | Allows selection or manual entry of a Site Contact, representing the person who should be contacted when attending site. The available Users in the list are client users assigned to the selected Contract and Site(s). |
| Site Contact Phone | Allows entry of a phone number for the Site Contact. The field auto-populates when a Site Contact is selected or can be modified if necessary. |
| Same as Requestor button | This button populates the Site Contact and Site Phone fields with the same values as the Requestor and Requestor Phone fields. |
3.8 Template View panel
The Template Panel allows users to preview the Quote PDF in real time. This view displays what will appear on the PDF when the quote is submitted and is viewable by client users when they review the quote online.
3.8.1 Refreshing the Template
- When changes are made to the quote, the template will not automatically update. This is to prevent continual recalculations which may result in slowness for the user. An information ribbon will appear when changes are made, allowing the user to manually refresh the template view.
- Click the ‘Refresh Template’ button to redraw the template.
3.9 Actions panel
The Actions Panel allows users to view a list of actions that have occurred on the Quote, and to add internal and client comments.
3.9.1 Add an Internal Comment
- Click the ‘Internal Comment’ tab.
- Add your comment to ‘Add Internal Comment’ text field. You can utilise tagging of other users by typing the ‘@’ character and selecting a user.
- Click the ‘Add’ button to add the comment.
3.9.2 Add a Client Comment
- Click the ‘Client Comment’ tab.
- Add your comment to ‘Add Client Comment’ text field. You can utilise tagging of other users by typing the ‘@’ character and selecting a user.
- Click the ‘Add’ button to add the comment.
For further information about tagging users when adding comments, please see CBC-PROC-251 “Tagging Users in Comments”.
3.10 Request and Approvals panel
The Request and Approvals panel allows users to review all the approvals and internal approval requests made on the Quote.There are no user actions available in this section.
3.11 Document Management panel
The Document Management panel allows users you to attach and view relevant documents to the Quote, such as emails, purchase orders, client approvals etc.
3.11.1 Add a Document
- Click the ‘+’ button on the Document table. A Document Management pop-up form will appear allowing you to enter details and upload the file.
- Drop your file on the Drop Zone or click the Drop Zone to bring up a file selection window. Starting with the file first will auto-populate the ‘Title’ field.
- Select Document Types as appropriate for what is being uploaded.
- If you would like the document to be attached to the Quote Submission email, toggle the ‘Send with Quote’ checkbox to On.
- If you would like the document to be attached to the Work Order Submission email, after Work Orders have been generated from the Quote, toggle the ‘Send with Work Order’ checkbox to On.
3.12 Change Log Panel
The Change Log panel allows users to view all changes that have been made to the Quote.
Access to this panel is permission-based so this may not appear for some users.
There are no user actions available in this section.
4.0 Special Actions
4.1 Save
- When you have reviewed all the information and ensured all mandatory fields have been populated, click the ‘Save’ button.
4.2 Internal Review Process
Before a Quote can be submitted to the Client, it must be approved internally. Depending on your approval limit, you may be able to perform this yourself, or you may need to select an additional approver to also approve the quote.
For a Quote to be able to be internally approved, the following conditions must be met:
- The Quote must be in the ‘In Progress’ state, set in the Details tab.
- All mandatory fields must be completed.
- At least one line item must be added.
- At least one asset must be added.
4.2.1 Internally approving a Quote
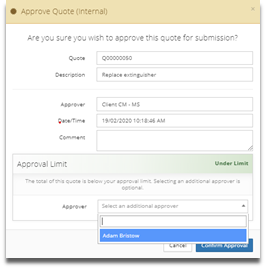
- Click the ‘Approve (Internal)’ button, located at the top and bottom of the view. The approval pop-up form will appear.
- Enter a comment in the ‘Comment’ field. This will be visible in the list of approvals and on the Notifications that will be generated by internally approving the quote.
- If the value of the Quote is beyond your approval limit, you will need to select an approver in the ‘Approver’ field. An additional approver can be selected even if the Quote is under your limit.
- Click the ‘Approve (Internal)’ button or the ‘Send to Approver’ button, depending on your selection.
When a Quote is internally approved, Notifications will be sent to users that have the ‘Quote Approved/Rejected (Internal) Notification’ notification enabled on their profile and are assigned to Contract and any Sites on the Quote.
When a Quote is sent to an approver, that user, if they have the ‘Quote Approval Request (Internal)’ Notification enabled, will receive a Notification.

4.3 Quote Submission Process
The Quote is ready to be submitted to the Client when the Quote is internally approved and has the ‘Review Passed’ status. The ‘Submit Quote’ button will not be visible prior to this time.
The Quote is only accessible in CMMS to Client users once the Quote is submitted.
4.3.1 Submitting the Quote
- From the Quote view, click the ‘Submit Quote’ button located on the button ribbon near the top of the view. The ‘Select Email Recipients’ pop-up form will appear.
- Review the users appearing in the ‘To’ and ‘CC’ fields.
- Recipients can be removed by clicking the ‘X’ button on the recipient’s name.
- Add recipients manually by clicking the ‘To’ or ‘CC’ field, typing the email address, and pressing enter.
- An optional customised message can be added to the email by entering text in the ‘Additional Message’ field.
- Click the ‘Send’ button to submit the Quote.
Submitting the Quote will send the Quote with an attached PDF, along with any documents attached on the Document Management panel that have the ‘Send with Quote’ flag set.

4.4 Client Approval Process
Once a Quote has been submitted, Client users can review it and approve or decline it.
4.4.1 How a Client Approves a Quote
- Navigate to the Quote by following the link in the Quote submission email or by finding it in the Quote List.
- Review the Quote.
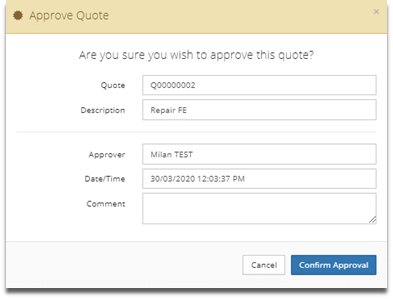
- Click the ‘Approve’ button, located on the top and bottom of the view. The ‘Approve Quote’ pop-up form will appear.
- Optionally, add text to the ‘Comment’ field to provide feedback. This is particularly useful when Quotes are declined.
- Click the ‘Confirm Approval’ button.
4.4.2 Approving a Quote on a Client’s behalf
- Navigate to the Quote by following the link in the Quote submission email or by finding it in the Quote List.
- Optionally, attach approval documents in the Document Management panel.
- Click the ‘Approve’ button, located on the top and bottom of the view. The ‘Approve Quote’ pop-up form will appear.
- Optionally, add text to the ‘Comment’ field to provide feedback. This is particularly useful when Quotes are declined.
- Click the ‘Confirm Approval’ button.

5.0 Workflow Panels
5.1 How to Add a Workflow Panel
- Navigate to your user profile by click your name on the top left corner, then clicking the ‘My Profile’ button. The User Profile view will load.
- Expand the ‘Workflow Settings’ panel.
- Click the ‘Add’ button. The ‘Add Workflow Panel’ pop-up form will appear.
- Make your selection.
- Click the ‘Save’ button to close the pop-up form.
- Click the ‘Save’ button at the bottom of the User Profile view.
For further detail on adding Workflow panels, refer to ‘CBC-PROC-127 Setting up Workflow Panels’.
5.2 Panel Descriptions
5.2.1 Workflow Panel: Quote, In Progress
| FIELD | DETAILS |
|---|---|
| Requested and In Progress | Quotes with the ‘Requested’, ‘In progress’ and ‘Review failed’ status with a breakdown by days since the Quote was created. |
| Awaiting Provider Quote | Quotes with the ‘Awaiting Provider Quote’ status with a breakdown by days since the Quote was created. |
| Awaiting Review (By me) | Quotes with the ‘Awaiting Review’ status and that were submitted to yourself for review with a breakdown by days since the Quote was created. |
| Awaiting Review (By others) | Quotes with the ‘Awaiting Review’ status and that were submitted to others for review with a breakdown by days since the Quote was created. |
| Review Complete | Quotes with the ‘Review Passed’ status with a breakdown by days since the Quote was created. |
5.2.2 Workflow Panel: Quote, Action Required
| FIELD | DETAILS |
|---|---|
| Submitted (awaiting Client Approval) | Quotes with the ‘Submitted’ status with a breakdown by days since the Quote was submitted. |
| Approved (Awaiting WO Creation) | Quotes with the ‘Approved’ status with a breakdown by days since the Quote was approved. |
| Expired | Quotes with the ‘Expired’ status with a breakdown by days since the Quote expired. |
5.2.3 Workflow Panel: Quote, Action Required (For Client users)
| FIELD | DETAILS |
|---|---|
| Submitted (Awaiting Approval) | Quotes with the ‘Submitted’ status with a breakdown by days since the Quote was submitted. |
| Expired | Quotes with the ‘Expired’ status with a breakdown by days since the Quote expired. |
6.0 Notification Settings
6.1 Modifying Notification Settings
- Navigate to your user profile by click your name on the top left corner, then clicking the ‘My Profile’ button. The User Profile view will load.
- Expand the ‘Notification Settings’ panel.
- Scroll to the ‘Quotes’ subsection.
- Adjust the checkboxes as desired.
For further detail on modifying Notification Settings, refer to CBC-PROC-063 Check and Update Distribution Lists.

6.2 Quote Related Notification Types
| NOTIFICATION TYPE | DETAILS |
|---|---|
| Receive Quote | The user will appear on the Quote Submission ‘To’ or ‘CC’ field when submitting a Quote. |
| Receive Quote Submitted | Notifies the user when a Quote is submitted. |
| New Quote Request Submitted | Not currently in use. |
| Quote Approval Request (Internal) | Notifies the user when an internal approval request is submitted to that user. |
| Quote Approved/Rejected (Internal) | Notifies the user when a Quote is internally approved or rejected. |
| Quote Approved/Declined | Notifies the user when a Quote is approved or declined by a Client user or the action is performed by CBC user on behalf of the Client. |
| Quote Expired | Notifies the user when a Quote expires. |