CBC-PROC-239 Version 1 last review date: May, 2019
A Custom Form Template represents a set of questions with corresponding response options that can be completed by users in formats such as Audits, Asset Inspections, or Induction Questionnaires.
There are a number of steps which must be completed for a Template to be made available to users, which include marking the Template as Active (explained in this procedure), and making the Template available on Contract Settings (explained in ‘CBC-PROC-245 CMMS - Add a Custom Form Template to a Contract’).
The ability to create and edit Custom Form Templates is governed by permissions. If you do not see the Custom Forms menu options on the Navigation Panel, your role is not permitted to work with Custom Form Templates.
1.0 Start a New Template
1.1 Click the ‘New Template’ menu option. The Custom Form Template editor will launch.

2.0 Load an Existing Template
2.1 Click the ‘Template List’ menu option.
2.2 Navigate the list to find the Template you wish to edit.
2.3 Click the ‘Edit’ button to launch the Custom Form Template Editor.
3.0 Complete the Template Header
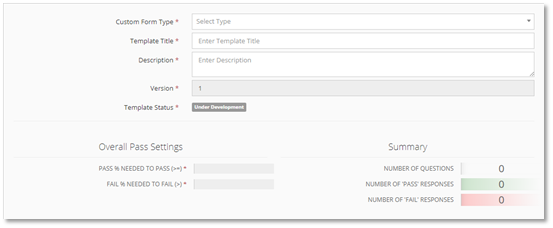
3.1 Select a Custom Form Template Type.
| ELEMENT TYPE | DEFINITION | AVAILABILITY |
|---|---|---|
| Induction Questionnaire | Performed as an Induction, tying in to a Users Qualifications. | Not Yet Available |
| Work Order Asset Inspection | Applied to Schedules to enable the creation of Service Reports, and in future, completion of Service Reports on the CMMS Technician App | Available |
| Pre-Work Audit | Performed as Audit’s on a Work Order | Available |
| Post-Work Audit | Performed as Audit’s on a Work Order | Available |
| Provider Audit | Performed as Audit’s on a Provider | Not Yet Available |
| Site Audit | Performed as Audit’s on a Site | Not Yet Available |
| Incident Report | To be confirmed | Not Yet Available |
3.2 Enter a Template Title.
3.3 Enter a Description.
3.4 Enter Overall Pass Settings
- Pass and Fail on audits are judged by Multi-Choice Responses. A multi-choice response can have responses considered ‘positive’, ‘negative’ or ‘neutral’, such as Pass, Fail or N/A, respectively. Each question with a positive response adds to the total of possible ‘Pass’ responses, and each time that response is selected on a Question during completion of the Audit/Inspection, the pass percentage increases.
- Enter a pass percentage required to pass an Audit or Inspection. A value of 100 would indicate that all multi-choice questions must be answered with a positive response to receive a Pass result.
- Enter a fail percentage required to fail an Audit or Inspection.
The Version number will automatically increment when edits are made to an active Template.
The Template Status will update automatically when a Template is made active and as new versions created and made active.
4.0 Select Template Types and Responses
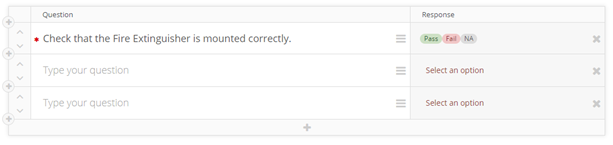
A Template starts with one Element. You can add as many elements as you need.
4.1 Adding an Element.
- Click the Plus button to add a new Element above or below an existing element.
- Click the Plus button situated at the bottom of the Template Editor to a new Element to the bottom.
- For each element added, select an element type via the Element Menu button, and type question or section text in the text field.
| ELEMENT TYPE | DEFINITION |
|---|---|
| Section | Allows the creator to add section breaks. No response is provided against Section elements. |
| Instruction | Allows the creator to add instructions to provide guidance to those completing the Audit/Inspection. No response is provided against Instruction elements. |
| Question | Allows the creator to add questions. Each question can have a different response type. |
4.2 Shift Element Position
- By clicking the ‘Up’ and ‘Down’ arrows on the left side of the Elements, the position of the Elements can be adjusted. The order that they appear in the Element Editor is the same order they will appear on the Audit/Inspection when being completed.
4.3 Set Response Option
- For each Element that is a Question (i.e. not a Section or Instruction), a response type must be selected. Click the Element Menu button ( ) to select the type of response the Question Element requires.
- Basic Response options allow the user to enter data freely, within the constraints of the type selected, such as text or a date. Photo uploads also fall into this category.
| QUESTION – BASIC RESPONSE | DEFINITION |
|---|---|
| Text | Allows the User to enter any Text response to the relevant Element. |
| Number | Allows the User to enter only Number response to the relevant Element. The number can be any valid number, including negative numbers. |
| Date | Allows the User to enter only date response to the relevant Element. The date can be any valid date. |
| Photo | Allows the User to upload one or more photos (.jpg, .gif, .png, .bmp) |
| Signature | Allows the User to upload a photo of a signature to the relevant Element. |
- Multi Choice Responses are a special kind of customisable response that allow the question to be answered with a pre-defined choice set, such as ‘Pass / Fail / NA’. The choices available can be selected from pre-defined sets, or you can create a new set.

4.4 Setting an Element as mandatory
- On the Element Menu, toggle the ‘Mandatory’ checkbox to indicate if the Question is mandatory and must be answered by the user completing the Audit or Inspection.
4.5 Removing an Element
- Click the Delete button (X) located to the right of the Element.
5.0 Activating the Custom Form Template
5.1 Once all edits have been made and you are satisfied with the Elements, and you have saved the template, the Template can be made Active by clicking the Activate button.
If the Template is already Active and you save a new version, the old version will become superseded, and users will immediately see the new version when commencing an Audit. Existing Asset Inspections will not be updated, but the Schedules they are attached to will reflect the new version of the template, which will be used the next time the Schedules are processed and Work Orders are generated.
If you are activating a new Template, it will be necessary to also make that template available to Contracts via Contract Settings. See procedure ‘CBC-PROC-245 CMMS - Add a Custom Form Template to a Contract’
6.0 De-activating a Custom Form Template
An Active Template can be made inactive by opening it via the Template List, then clicking the ‘De-activate’ button.
The Deactivate button is only available on Templates that are currently active.
7.0 Editing an Active Custom Form Template
Active Templates can be edited, and when saved, this will be saved as a new version of the Template. This new version will not be Active until the Activate button is clicked.
There can only be one active version of Template at a time.
8.0 Duplicating a Template
Click the ‘Template List’ menu option.
Navigate the list to find the Template you wish to duplicate.
Click the ‘Duplicate’ button ( ) to launch the Custom Form Template Editor with a copy of the source Template.
9.0 Further Steps
After Activating a new Template, it is necessary to add it to each Contract for users to begin making use of it. Additionally, if you are working on a Work Orders Asset Inspection template, you will also need to add it to Schedules.
- See ‘CBC-PROC-245 CMMS - Add a Custom Form Template to a Contract’